

How We Got Our Newborn's OCI Card: A Complete Step-by-Step Guide for Indian Parents in the USA (2026)
We got our newborn's OCI card approved in 7 weeks. Here's everything that actually works — photos, thumbprints, notarization, VFS shipping, and the gotchas no one tells you about.


We just received our sons OCI card in the mail. ✅
If you’re an Indian citizen living in the US with a newborn, this post is for you. Getting an OCI (Overseas Citizen of India) card for a US-born baby is one of those tasks that sounds straightforward but has enough gotchas to derail you for weeks. This is the guide I wish I had — written from lived experience, not just official documentation.
Our situation: Both parents are Indian citizens living in Washington, USA. Baby born in Washington State. We had US passport and apostilled birth certificate in hand before we started.
Why OCI Matters (Quick Recap)
An OCI card gives your child lifelong visa-free travel to India, the ability to open bank accounts, own property, and generally be treated as a domestic traveler. It’s a permanent card that only needs to be reissued when the child’s passport changes (until they turn 20, then once more after that). Getting it done early — while your baby is a newborn — is the right call.
What You Need Before You Start
Before touching the OCI portal, make sure you have:
✅ Baby’s US passport
✅ Apostilled birth certificate (not just the regular one — it must be apostilled)
✅ Both parents’ valid Indian passports
✅ Both parents’ H1B I-797/Green Card notices (or equivalent immigration status docs)
✅ Marriage Certificate
✅ Indian Passport of Father
✅ Indian Passport of Mother
✅ Address Proof — both parents’ Washington State Driver’s Licenses
✅ Ink stamp pad (for baby’s thumbprint — more on this below). We got a blue one from Amazon.
The Process: 7 Steps
Step 1: Get the Baby’s Photo Ready
This tripped us up more than anything else. The official OCI photo spec is strict:
The easiest way to shoot it: Lay your baby flat on a white surface and hold your camera directly overhead at 90°. This eliminates any tilt or perspective distortion. Natural window light works great — avoid flash shadows.
For babies under one year, the spec explicitly states eyes don’t have to be open and facial expression requirements are relaxed. So don’t stress if baby isn’t cooperating perfectly.
Pro Tip: Light colored background — almost white but not pure white. The official Photo Spec PDF says “not white” but in practice some VFS centers have rejected photos with non-white backgrounds. Play it safe — use a light grey surface that reads as almost white.
I used ChatGPT, Gemini, US Passport Photo Tool to resize and have the photo ready in the format requested.
Printing the photo: Use idphoto4you.com — it’s a free tool that lets you upload your photo, crop it to the correct dimensions, and download a print-ready version. Then take it to Walgreens to get it printed for a few cents. Much cheaper than going to a professional photographer or a CVS photo center.
Step 2: Get the Baby’s Thumbprint Ready
For minors who cannot sign, the left thumb impression goes in the signature box. Parents must NOT sign in the applicant’s box — this is explicitly stated in the instructions.
The signature image spec:
JEPG, maximum 3500×2500px, under 500KB
How to get a usable thumbprint from a newborn:
Get a washable blue ink stamp pad. We got a blue one from Amazon.
Have wet wipes ready nearby.
Do a couple of “practice” presses on white paper first to remove excess ink
Press baby’s left thumb firmly — a blotch is fine, they are lenient with infants. I ended taking his thumb 10 times on a letter paper.
Scan the entire paper and then extract the best impression using any image editing tool. I asked ChatGPT to extract the best one in the spec above.
Step 3: Complete the Online Application at ociservices.gov.in
Go to ociservices.gov.in and fill out Part A and Part B.
The portal has 9 specific upload slots — one document (or merged PDF) per slot. Each file must be under 1000KB in JPEG or PDF format. Use ilovepdf.com to merge and compress where needed.
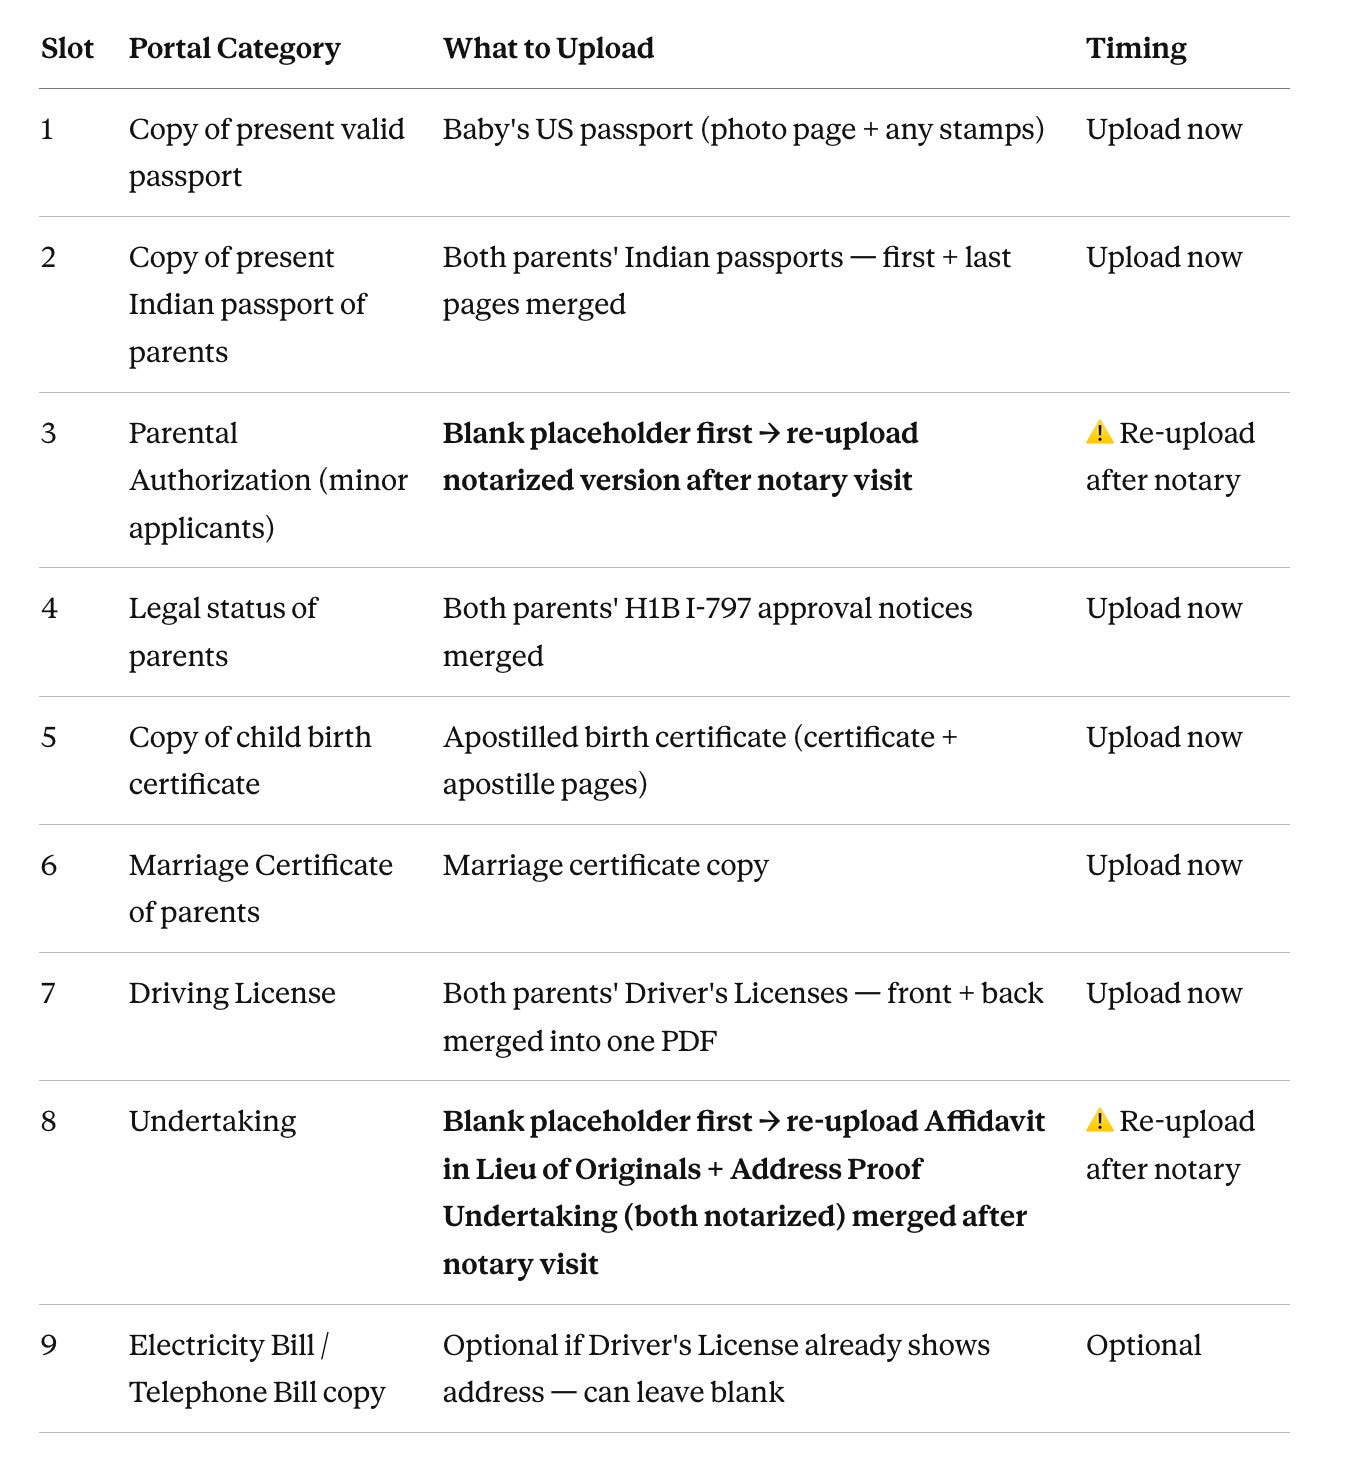
Pro Tip: Self-attest all physical copies (both father and mother) by writing “True copy of original” and signing each page and then upload on the OCI portal.
Key tips:
Upload a blank placeholder for the Parental Authorization , Affidavit in Lieu of Originals and Address Proof Undertaking during initial submission — you can notarize it after you’ve printed Part A in one notary trip.
You are allowed to re-upload documents/photo and signature after submission using your File Reference Number.
Once you have filled the application go ahead and submit it (Its okay to submit with placeholder documents as you can re-upload them later). Note your File Reference Number — you’ll use it constantly
Step 4: Get Documents Notarized
Four documents require notarization — bring all of them to the notary in one trip:
OCI Application Form Part A — two spots need to be executed before the notary:
Declaration section: baby’s left thumbprint (the applicant “signs” here — parents must NOT sign in this box)
“Application for Minor Child” section: boths parent’s sign.
Parental Authorization Letter — both parents sign
Affidavit in Lieu of Originals — both parents sign
Address Proof Undertaking — both parents sign
Pro tip: Public libraries/banks often offer free notary service to customers — call ahead to schedule. Even UPS/FedEx offer notary services.
What goes in the Affidavit in Lieu of Originals? List every document for which you’re submitting a copy rather than the original (mentioned in Step 3).
After notarization, go back to the OCI portal and re-upload the notarized Parental Authorization, Affidavit in Lieu of Originals and Address Proof Undertaking — replacing the blank placeholder. Don’t forget this step.
Step 5: Pay Fees and Ship to your VFS Center.
Go to VFS Global:
Log in and enter your File Reference Number
Skip the SMS and Photo add-on services — they’re unnecessary
Note on the FedEx label option: VFS charges for a FedEx label, but the service fee already includes return delivery to you (via USPS or a slower method). The FedEx return label is optional — only buy it if you want faster tracked return shipping.
Pay and download your Fee Receipt and Application Confirmation Letter
Shipping to VFS — use Pirate Ship: Instead of buying a FedEx label from VFS or paying full UPS rates at the counter, use pirateship.com to create a discounted shipping label. It’s significantly cheaper than walk-in UPS pricing for the same service. Drop your envelope at any UPS location.
Physical Package to VFS
OCI Application Form Part A — printed original (Declaration page notarized with left thumbprint)
2 Baby’s photo — U-clip only (no staples, no glue, no signature on the photo)
Parental Authorization Letter — notarized
Affidavit in Lieu of Originals — notarized (includes Driver’s Licenses as address proof)
Address Proof Undertaking — notarized
Undertaking by the OCI Applicant — signed by parent as guardian
Consent Letter — signed by parent as guardian
Baby’s US Passport copy — self-attested
Birth Certificate + Apostille copies — self-attested
Both parents’ Indian Passport copies — self-attested
Marriage Certificate copy — self-attested
Both parents’ H1B I-797/Green Card copies — self-attested
Both parents’ Driver’s License copies — self-attested
VFS Fee Receipt + Application Confirmation — printed
Pre-paid FedEx label — printed (Optional)
Packing the envelope:
Write on the outside with permanent marker: “NEW OCI – MINOR – BY BIRTH”
Step 7: Track and Wait
Track your application at services.vfsglobal.com/usa/en/ind/track-application using your File Reference Number.
Expected timeline: ~7 weeks from when VFS receives your envelope.
If you receive a hold notice, you have 21 days to respond — re-upload the corrected document on the portal AND courier a physical copy with a fresh printed Part A.
The Gotchas — What Almost Tripped Us Up
1. Background color — a confusing contradiction
The official OCI Photo Spec PDF explicitly says “plain light color background (not white).” However, multiple applicants online have reported VFS returning their application requesting a white background — the exact opposite. In practice this appears to be inconsistently enforced depending on which VFS center processes your application.
Our approach: we used a light grey background that was almost white — close enough to satisfy VFS if they expected white, but technically compliant with the official spec. Use image processing tools for this.
2. Parents cannot sign in the applicant’s signature box
This is clearly stated in the form: “In case of minor who cannot sign, his/her left thumb impression may be placed in the signature box. Parents should NOT sign on behalf of the children.” The parent signature goes only in the separate “Application for Minor Child” section.
3. Re-upload the notarized documents
The initial upload is a blank placeholder because you need to print Part A before notarizing. After the notary visit, you must go back and re-upload the real version. It’s easy to forget.
4. Apostille is mandatory for the birth certificate
A regular birth certificate is not enough. If your state issues apostilles (all US states do), make sure you get the apostilled version before applying. For Washington state you can requesy one here
6. Re-upload limit on the portal
You can only re-upload and view a document a limited number of times on the OCI portal. The exact count isn’t published but it is low. This means two things: don’t open the document view unnecessarily just to check, and make sure your scans are clean and correct before uploading. The Parental Authorization re-upload (replacing the blank placeholder with the notarized version) counts against this limit — so don’t waste attempts on test uploads.
Final Thoughts
The OCI process for a US-born newborn is manageable if you know what to expect. The biggest time sinks are getting the photo right, scheduling the notary appointment, and the postal processing time. Start early — we started when our kid was a few months old and are glad we didn’t wait.
Total cost: $275 USD (standard OCI fee for applications submitted outside India) plus ~$75 in VFS and notary costs.
If you have questions, drop them in the comments below. Happy to help.
This guide reflects our personal experience filing through CGI Seattle in early 2026. Requirements and processes can change — always verify against the official ociservices.gov.in portal and your nearest Indian consulate before applying.
Tags: OCI card, Indian parents USA, newborn OCI, H1B baby OCI, overseas citizen of India, immigration, expat parenting.